
Reconstruct lets you have different project loading modes. You can choose to load and start your projects in 2D view, 3D view, or Image view, which would bring Street View Experience to you.
In order to set Street View as your default project loading setting follow these steps:
- Log in to Reconstruct.
- Go to a project's Data Manager or Viewer.
- On the top right corner, click on your name.
- Click on Edit User Profile.
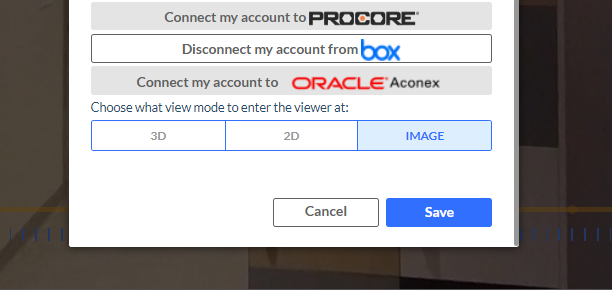
- Scroll to the bottom of the list, find the section that says "Choose what view mode to enter the viewer at:"
- Set that to "Image".
Remember that this setting is saved on the user level, not the project level. For example, if you selected "Image" in the above step, every time you log in to Reconstruct using your user information you would start all your projects in Image mode (Street View). If you want other users of your project(s) to have the same experience you need to ask them to set this setting on their own user profiles.
Here is what you should expect during the Street View Experience:
- Street View Experience is designed to minimize the need of switching your view mode to 2D and 3D, and encourage you to always stay in Image view mode.
- Your project(s) always starts in the Image view. If you don't have a default location defined, Reconstruct automatically finds what location has the most recent capture of your project, and lands you inside an image that belongs to the reality capture.
- If you have defined a default location in your project, you always start inside an image that belongs to the most recent capture of your default location.
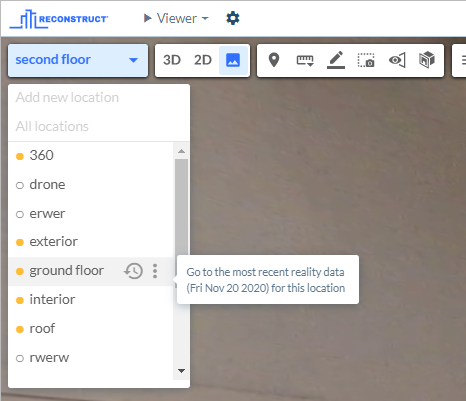
- Navmap is showing all camera types, including image positions (Capture App pinned images)

- When you open the Location Dropdown list, locations that have a reality data on the active date of the Timeline would have a yellow dot next to them.
- Each location item has a Time Travel button (clock icon) that takes you to the most recent reality capture in that location.
Comments
0 comments
Please sign in to leave a comment.